
Updated October 2026. Written and medically reviewed by M. Brett Raynor, M.D.
If you are scheduled for rotator cuff repair, it is natural to wonder what actually happens once you are in the operating room. This guide walks through the operation the way Dr. Brett Raynor performs it, in the order it happens: the anesthesia, the small incisions, each step of the repair, closing up, and going home.
The short version. Dr. Raynor performs rotator cuff repair arthroscopically, with a camera and small instruments through four or five small incisions, as an outpatient surgery. The torn tendon is cleaned up, the bone where it belongs is roughened, and the tendon is held back down against the bone with small anchors and sutures so it can heal there. As he explains it to patients, the goal is to "stick it back down there and hold it there so that it can heal back into the bone." Most repairs also include a biceps tenodesis. You go home the same day in a sling.
More on rotator cuff repair from Dr. Raynor:
Rotator cuff repair: how Dr. Raynor does it, including what happens if a tear cannot be fully repaired and how often repairs heal
Rotator cuff repair recovery roadmap, stage by stage
Rotator cuff repair FAQs: dressings, the sling, medicines, driving and more
Watch the surgery
Dr. Raynor narrates an animation of his rotator cuff repair, step by step. The chapters and full transcript are on the rotator cuff surgery video page.
A quick look at the anatomy
The shoulder is a ball and socket. The rotator cuff is four tendons, deep inside the shoulder, that help start and control its motion: one on top, one in the front, and two around the back. The tendon on top is the one that tears most often. When a tendon tears away from the bone, it usually cannot heal back down on its own, because it has pulled away from the surface it needs to heal to. Surgery puts it back where it belongs and holds it there while it heals.
One of the two biceps tendons also matters here. It runs up the front of the arm and makes a ninety-degree turn through a tight little sheath into the shoulder, right next to the rotator cuff. That spot is a common source of pain, especially next to a tear, which is why the biceps comes up in step 2.
Before the surgery begins: anesthesia and the nerve block
You will meet the anesthesia team before surgery. In the operating room, just before you go to sleep, an anesthesiologist places a nerve block that numbs the shoulder and arm, and then you go to sleep under general anesthesia for the operation itself. The block keeps the arm comfortable for the first one to three days after surgery and wears off slowly. For the operation you are positioned sitting partly upright, in what is called the beach-chair position.
Step 1: Small incisions and a look inside the joint
Dr. Raynor works through four small poke-hole incisions, sometimes five if the tear needs another angle. One carries the arthroscope, a small camera; the others carry the instruments.
Before repairing anything, he looks at everything inside the joint: the biceps tendon, the socket and its rim (the labrum), the cartilage of the ball, and the underside of the rotator cuff. Anything frayed is cleaned up with a small shaver.
Step 2: The biceps tendon (biceps tenodesis)
In most rotator cuff repairs, Dr. Raynor also treats the biceps tendon so it does not keep hurting after the cuff is fixed. This is called a biceps tenodesis.
He lassoes the tendon with a stitch and cinches it down, then places a second stitch just above it so it cannot roll off. He then releases the tendon from the top of the socket so it no longer crosses the joint, and reattaches it to the arm bone near the top of its groove. From there it no longer pistons in and out of that groove, which is what was hurting. In some shoulders, he reattaches the biceps a little lower on the arm instead, through a small incision near the armpit.
Why not simply release it and leave it? The arm would work, but the muscle can ball up in the upper arm, the "Popeye" look. Reattaching it avoids that. The tenodesis adds only a few minutes at the start of the surgery and does not usually change the recovery.
Step 3: Clearing the space above the tendon
The camera then moves into the space above the rotator cuff. There is a small fluid-filled sac there, the bursa, that normally helps the tendon glide under the bone above it. With a tear it is often inflamed. Dr. Raynor removes it so he can see the torn tendon clearly from above and judge how far it has pulled back.
Step 4: Preparing the bone
The spot on the arm bone where the tendon used to attach is called the footprint. Dr. Raynor roughens it with a small shaver so the tendon has a fresh, bleeding surface to heal to. In his words: "when it's pulled away, it can't heal back in there." A prepared surface gives it something to heal into.
Step 5: The first row of anchors
Next, small anchors go into the bone right at the edge of the joint, along the inner edge of the footprint. Usually there are two, sometimes more for a bigger tear. Each anchor is either made of suture material or is a small anchor with sutures coming out of it. The front anchor goes in first.
Step 6: Passing the sutures through the tendon
One at a time, the sutures from the front anchor are brought out through a small clear tube called a cannula. A suture passer then bites through the torn edge of the tendon and fires each suture up through it. The finished sutures are parked out of the way at the front of the shoulder. The back anchor then goes in, and its sutures are passed through the tendon the same way.
Step 7: Tying, crisscrossing and the second row
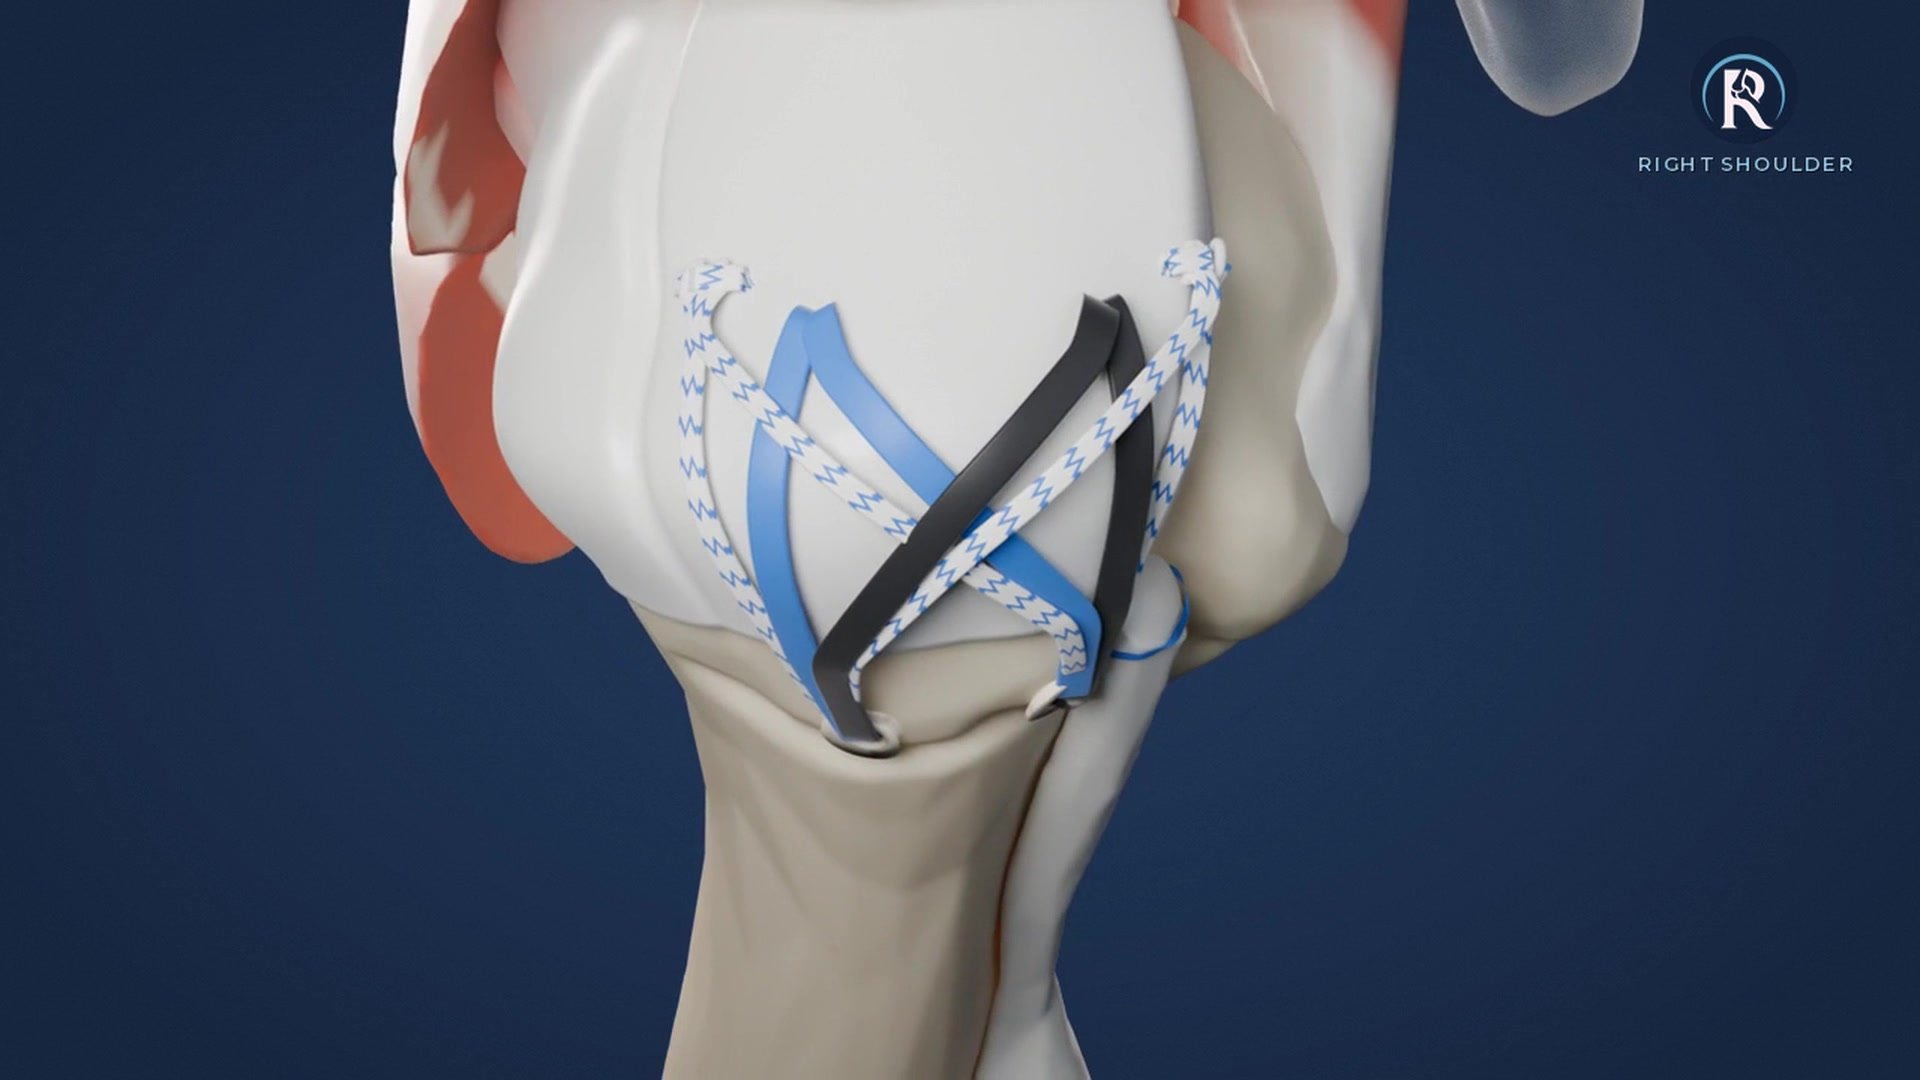
Dr. Raynor ties one stitch at the front and one at the back to hold the edge of the tendon down where it belongs. He then crisscrosses the remaining sutures and tapes over the top of the tendon and locks them into a second row of anchors on the outer side of the footprint.
This is what surgeons call a double-row repair. Instead of holding the tendon by a single line of stitches, it presses the whole width of the tendon flat against the roughened bone, the way a strap holds down a tarp. Now the tendon sits right back where it came from and moves with the bone as one piece.
Step 8: Making room above the repair
Lastly, Dr. Raynor shaves down the bone spur on the underside of the roof of the shoulder, just above the tendon. That gives the repaired tendon more room to move so it does not get rubbed on.
What if the tendon will not reach?
Sometimes a tear has been there so long that the tendon has pulled back and settled into a new position, and it will not reach the bone without too much tension. Dr. Raynor plans for this before every repair and talks through the options with you beforehand. They include repairing the part of the tendon that will reach, using the biceps tendon to cover the gap, a patch placed over or under the repair, and a small balloon spacer that keeps the ball centered in the socket. A repair does not have to be complete to give you a shoulder that works well. The details are on the rotator cuff repair page.
Step 9: Closing the incisions
Each poke hole is closed with a single stitch; no staples are used. A sterile dressing goes on, and the arm is placed in the sling before you leave the operating room. The stitches come out at your first post-operative visit, usually one to two weeks after surgery.
In the recovery room and going home
You wake up in the recovery room with the arm numb from the nerve block and already in the sling. Rotator cuff repair is outpatient surgery, so you go home the same day. Plan for someone to drive you home and stay with you the first night. Most patients sleep best propped up in a recliner or on a ramp of pillows for the first few weeks.
After surgery: what the next months look like
The recovery calendar comes from how long a tendon takes to heal to bone, and it follows a predictable rhythm. Dr. Raynor describes it in stages: the repair is locked in and protected, the shoulder gets stiff, you work the stiffness out, and then you work the weakness out.
Sling for six weeks, including at night. Once the nerve block has worn off and you have control of the arm, you can take it off to work at a computer, eat or shower, keeping the arm resting at your side.
Weeks 6 to 12: out of the sling, using the arm for normal things below shoulder level, and working the stiffness out with your physical therapist.
About 3 months: strengthening begins, slowly and lightly.
About 4 months: Dr. Raynor considers the tendon healed to the bone.
About 6 months: most people are doing what they want, though they still notice the shoulder.
About 1 year: most people stop thinking about the shoulder at all.
Being in a sling is, as Dr. Raynor tells patients, mostly about "asking other people for help." You still have one good arm and two good legs; you are just not doing much with the operated arm for six weeks. The full stage-by-stage guide, including driving, sleeping, showering and returning to work, is on the recovery roadmap, and day-to-day questions are answered in the rotator cuff repair FAQs. For what to do in the weeks before surgery, see Preparing for Rotator Cuff Repair Surgery.
Common questions about the operation
Is rotator cuff repair done through a large incision? Not in Dr. Raynor's practice. He performs the repair arthroscopically through four, sometimes five, small poke holes.
Will I be asleep? Yes. You have a nerve block to numb the shoulder and arm, and general anesthesia for the operation.
Why is my biceps being moved if it is not torn? Because the biceps tendon is a common source of pain after an otherwise good repair. Moving it out of its groove at the start of surgery takes a few minutes and does not usually change the recovery.
Do I go home the same day? Yes. Rotator cuff repair is outpatient surgery.
How long until the tendon is healed? Dr. Raynor considers it healed to the bone at about four months. That timeline is based on research into how long soft tissue takes to heal to bone, which is why the sling and the strengthening calendar are set the way they are.
The bottom line
Rotator cuff repair puts a torn tendon back where it belongs and holds it there so it can heal. Dr. Raynor does it arthroscopically, as outpatient surgery, in a set order: a nerve block and anesthesia, a look around the joint, the biceps tenodesis, clearing the space above the tendon, preparing the bone, two rows of anchors with the sutures crisscrossed between them, smoothing the bone spur, and closing each poke hole with a single stitch. The work after surgery matters as much as the work in the operating room, and the recovery roadmap lays it out stage by stage. If you have questions about your own shoulder, bring them to your visit with Dr. Raynor or his team.
Written and medically reviewed by M. Brett Raynor, M.D., board-certified orthopaedic sports medicine surgeon, Texas Orthopaedic Associates, Dallas. Last reviewed 10/2026. General information for patients; your own surgical plan and post-operative instructions come first.